
Every minute counts when you’re working on a busy highway, airport runway or city street. Knowing the correct operations of your drill will keep you drilling quickly and safely.
Here are four aspects to consider to keep the drilling work on schedule.
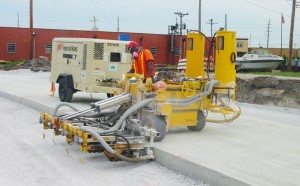
Get Your Drill Ready
Taking a few minutes with your concrete dowel drill prior to firing it up can prevent downtime. Start by checking the air compressor’s capabilities — each gang needs 100 cfm, so a 3-gang drill for a lane addition project, for example, needs at least 300 cfm. Next, inspect the air compressor hose and make sure that there are not any hose leaks prior to attaching it to the drill.
Verify the concrete dowel drill has adequate oil and, if needed, fill with rock drill oil. Other lubricants, such as pneumatic tool oil and automatic transmission fluid, burn too quickly, which can damage the drill motor.
Check that the drill features the correct chuck size and the right drill bit length for the holes, too. Replace the bit if it’s worn or doesn’t meet the depth requirements. Be sure to use the correct bit guide bushing, as well. Next, adjust the drill spacing and height, level the drill, and set the drilling depth.
Select the Right Settings
Feed pressure directly impacts drill efficiency. A setting that’s too low causes the drill to bounce on the concrete rather than drill into it, while pressure that’s too high results in the bit slowing or stopping. The correct setting depends on the concrete hardness and drill bit diameter.
If you’re unsure on the psi, start with pressure between 18 to 25 psi for horizontal drill applications, such as road repairs, and at 5 to 9 psi for vertical drilling applications, such as pinpointing a gas leak. Then, adjust the pressure, as needed. Keep in mind that if you have more than one gang, such as with double-gang and multi-gang drills, you’ll select the pressure individually for each gang.
Keep Things in Order
Once you’ve placed the drill in the right spot on the slab or grade, feed the drill by placing it against the concrete. Move the feed control valve to the in position and then flip the main power switch on. After you’ve reached the needed hole depth, turn off the motors to prevent dry-firing and damage to the trunnion bolts, which secure the latch that holds the bit in the drill. If you’re using one of our multi-gang drills, the automatic drill shutoff will eliminate dry firing.
Next, place the feed control valve in the out position to remove the drill from the hole. If the bit is stuck, turn off the power until it fully retracts.
Follow Safety Procedures
Installing a dust collection system on your drills can greatly reduce the amount of dust operators are exposed to, and improve jobsite visibility
Be sure to wear a dust mask while drilling because the concrete drill produces dust. Also, consider pairing a drill with our dust collection system, which mounts to the end of the bit guide and vacuums the dust as it’s released. The dust collection system minimizes the amount of dust that workers breathe and improves worksite visibility.
Avoid pinch points by keeping fingers and arms away from the carriage assembly and engaging the carriage lock when appropriate. When moving the drill on the concrete to the next set of holes, our patented tri-steering system decreases muscle strain because you simply turn the wheel to adjust the drill’s position.
When you’re using a concrete dowel drill, the goal is simple — to drill holes. By following correct operational steps, you’ll complete the work quickly and safely. That leads to a long drill life and greater profitability from every hole.
Have more operations questions? Look over our online resources or contact us today.
